Browsing Tag

DIY

13 In Inspiration/ Real Weddings

Simple, Intimate, Outdoor Wedding in Texas

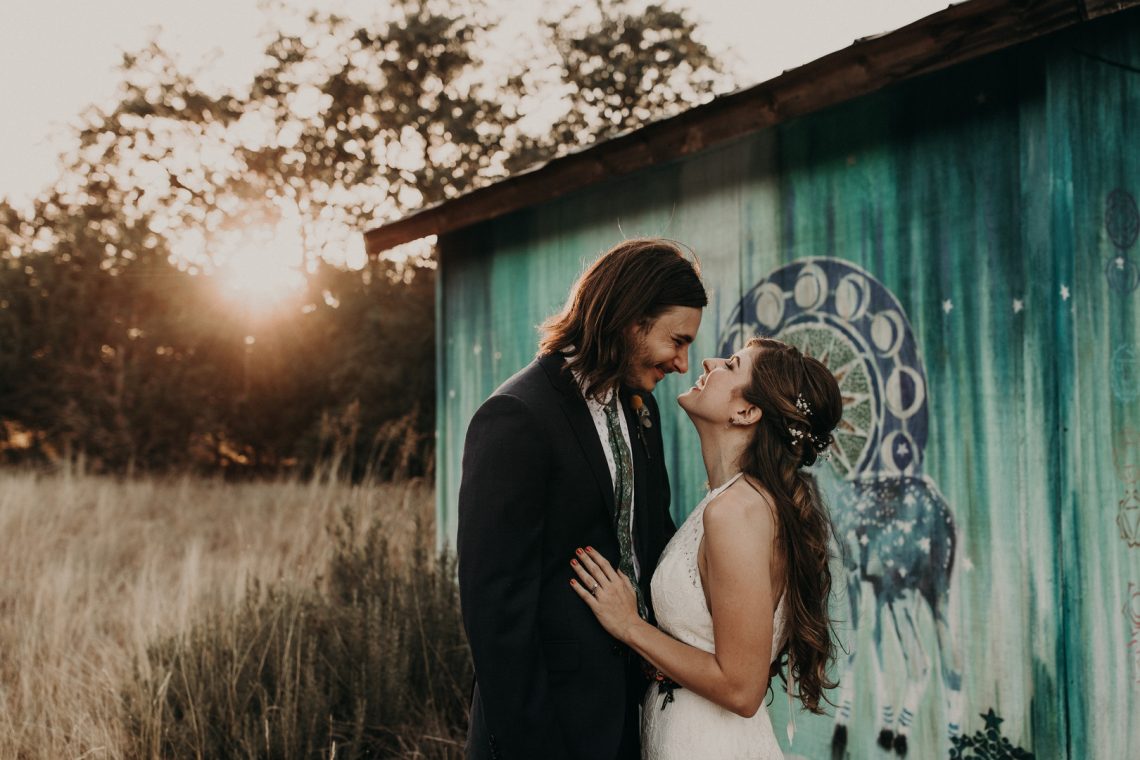
Alison and Austin were high school sweethearts, together for 10 years before finally tying the knot in an intimate outdoor wedding at La La Park in San Marco, Texas.

Buck_Davis_NikkNguyenPhoto_AlisonAustin401_big
Buck_Davis_NikkNguyenPhoto_AlisonAustin407_big

The couple was less concerned with the aesthetics for the big day, instead, focusing on the feeling of the event. They wanted something simple, intimate, and outdoors (both graduated with Environmental Degrees). They just wanted to dance and celebrate with family and friends.

Buck_Davis_NikkNguyenPhoto_AlisonAustin5_big
Buck_Davis_NikkNguyenPhoto_AlisonAustin13_big
Buck_Davis_NikkNguyenPhoto_AlisonAustin16_big
Buck_Davis_NikkNguyenPhoto_AlisonAustin17_big

Alison and Austin conceived most of their ideas around the idea of simplicity. They decided to skip the traditional cake, party favors, and wedding party. They chose to splurge on photographer Nikk Nguyen so they could have great photos to look back on years from now.

Buck_Davis_NikkNguyenPhoto_AlisonAustin146_big
Buck_Davis_NikkNguyenPhoto_AlisonAustin165_big
Buck_Davis_NikkNguyenPhoto_AlisonAustin158_big

A special moment for the couple was taking 10 minutes of personal time directly after the ceremony.

That time was incredible to be able to sit and reflect and talk about how crazy the whole day had been! Getting a little alone time prior to stepping back into the craze that is a wedding was huge.

Buck_Davis_NikkNguyenPhoto_AlisonAustin204_big
Buck_Davis_NikkNguyenPhoto_AlisonAustin219_big
Buck_Davis_NikkNguyenPhoto_AlisonAustin213_big

The majority of the DIY wedding details were a true family effort with the sister-in-law arranging all the flowers, one of the groom’s best friends acting as officiant, recycling decorations from Alison’s brother’s recent wedding, and family and friends helping with all the setup. Even the engagement ring was a family heirloom from Austin’s great grandmother.

Buck_Davis_NikkNguyenPhoto_AlisonAustin343_big
Buck_Davis_NikkNguyenPhoto_AlisonAustin481_big
Buck_Davis_NikkNguyenPhoto_AlisonAustin349_big
Buck_Davis_NikkNguyenPhoto_AlisonAustin475_big

As for advice for couples planning their weddings now, the couple says:

Relax! It isn’t about the wedding. Be present. Feel everything that you are experiencing. Do your best to stay in the moment. Everyone says it because it’s true, but it’ll be over in a flash and you’ll be sorry if you don’t take the time to enjoy it!

Buck_Davis_NikkNguyenPhoto_AlisonAustin597_big
Buck_Davis_NikkNguyenPhoto_AlisonAustin665_big
Buck_Davis_NikkNguyenPhoto_AlisonAustin446_big
Buck_Davis_NikkNguyenPhoto_AlisonAustin669_big

Vendors

Cake Designer: VooDoo Donuts
Caterer: Lupe Tortilla
Groomsman Attire: Men’s Wearhouse
Makeup Artist: SC Beauty
Hair Stylist: SC Beauty
Dress Designer: David’s Bridal
Event Venue: Lala park
Photographer: Nikk Nguyen Photo

16 In DIY Projects/ Flowers/ Inspiration

Pantone’s Living Coral-Inspired DIY Bouquet

By now you’ve probably heard that Pantone’s Color of the Year is Living Coral. It is everywhere, especially in florals. The vibrant hue draws inspiration from below the sea, hence the name, and captures glowing tones rarely seen above water. Thankfully, with the help of artificial flowers, you can have the best of both worlds – any color, any season, any flower!

LeAnne Samuelson, Creative Director at Afloral, loves using pops of coral in her DIY bouquet arrangements. According to LeAnne…

Sometimes I come across a color or combination and I love it. It’s not always planned but I see the colors together out in nature or online and I throw it all together. You just get a feeling!

By pairing complimenting colors (coral & white) you add dimension. Samuelson shared with us her steps for this DIY bouquet, choosing white dahlias, cherry blossoms, coral & peach roses, and salal greenery. You can also use artificial flowers (Afloral has all those shown), or you can opt for real flowers or even paper flowers. Same steps for all.

Afloralcom_CoralCherryBlossomBouquetSpringSummer_big
Afloralcom_CoralCherryBlossomBouquetSpringSummer3_big
Afloralcom_CoralCherryBlossomBouquetSpringSummer5_big
Afloralcom_CoralCherryBlossomBouquetSpringSummer2_big
Afloralcom_CoralCherryBlossomBouquetSpringSummer4_big
Afloralcom_CoralCherryBlossomBouquetSpringSummer8_big

Step 1: Find your focal flowers. Whatever catches your eye – color or texture – start there.

Step 2: Build around the focal point. Let it grow organically.

Step 3: Tape away! Samuelson uses floral tape every time she adds a new stem – it allows her to finetune later on.

Step 4. Keep the stems long and don’t trim till the end – you can change their heights later.

Step 5. Add your greenery. Fill in wherever could use a little love!

Step 6: Top it off with a ribbon or simply drop it in a vase for decoration.

Afloralcom_CoralCherryBlossomBouquetSpringSummer15_big
Afloralcom_CoralCherryBlossomBouquetSpringSummer17_big
Afloralcom_CoralCherryBlossomBouquetSpringSummer11_big

Hopefully, these steps will encourage you to take a chance and try to make your own bouquet. You may decide you still want to leave the actual wedding bouquets up to the professionals but at the very least, this could be a fun activity with your bridesmaids. And who knows… maybe you’ll surprise yourself with something great!

1 In Contests & Giveaways/ Decor/ DIY Projects

DIY Day: Personalized Napkins + Promo

I’m back with another fun DIY project.  Yay!
So I’m totally stuck on this Silhouette machine I bought a few months ago and have been trying to figure out how to make a lot of different things with it, especially ones that could be used for a wedding.  The Silhouette folks were nice enough to send me some of their heat transfer material to play around with and I came up with a fun project that I can’t wait to do for my next dinner party… personalized napkins.


DIY napkins via Indie Wed

Couples are always looking for ways to add personal touches to their nuptials.  These cute napkins are one way.  And if it seems too overwhelming for a whole wedding, just focus on the head table.  Or think about smaller, related events such as the rehearsal dinner or even an engagement party.  Incorporate initials or a monogram like I’ve done, or use some other design element from your wedding; silhouettes, a pattern, text… the possibilities are endless.

The transfer material comes in all sorts of colors (including glitter and some fuzzy flocked colors too) and once ironed on can be washed (with some care).

First I drew out my design in the computer.  You have to make sure the design is then mirrored so that it cuts backwards.  Trust me, it will work in the end.  Once you have your design all set, feed your heat transfer material into the machine and send it through.

napkin2

napkin

Once your design is all cut out, you peel away the material covering the negative space.  They even make this handy little hook that helps getting all the little bits from any nooks and crannies.

napkin3

The remaining transfer material is on this slightly sticky piece of plastic.  Take that and place it onto your napkin so the design is now going the correct way.  Lay a piece of fabric over the transfer press firmly with an iron for 45-60 seconds.  This is where it can get a little tricky. You have to start peeling back the corner and see if it is all stuck down.  If not, you apply more heat and recheck until the plastic comes off cleanly.  With my project, it worked great except for one little part of the vine where it was the thinnest.  It didn’t transfer as well and I had to fidget with it more.  But with more practice I think it would be super easy.

DIY napkins via Indie Wed

For my napkins, I used raw linen that I cut and sewed into a napkin.  Obviously you don’t have to go that far.  You could easily buy pre-made napkins and add the transfer.  Heck, you could do the same on the tablecloth as well.  Or a vintage hankie tied around a wine bottle for a centerpiece.  Or canvas totes for guests. I could keep going…

DIY napkins via Indie Wed

Overall, I think this project was super cute.  I really liked the look of the black against the linen with this particular design but I could totally see doing something really wild with color.  Lucky for you, there is a promotion right now for you to try out the handy dandy heat transfer material yourself.

June Promo via Indie Wed

Silhouette has a promo going on right now where you can get either the Cameo or the Portrait plus the heat transfer starter kit for a huge discount.  Personally I’m a little jealous since it is cheaper than what I paid for mine.  If you already have a Silhouette machine you can just by the transfer materials for a buy 1 get 1 free deal.  (The free item is the one that is equal or lesser value).  Just follow this link and use the promo code INDIE for the discount.  Have you used the heat transfer material before?